> ## Documentation Index
> Fetch the complete documentation index at: https://docs.procuros.io/llms.txt
> Use this file to discover all available pages before exploring further.
# Order Responses
> Learn how to confirm, reject, or partially confirm incoming orders from your trading partners in Procuros.
 When you receive an order via Procuros, you can respond in three ways:
* **Confirm the order** if everything looks good
* **Reject the order** entirely if you cannot fulfill it
* **Partially confirm the order** if some items, quantities or dates needs to be adjusted
Each of these actions creates an **Order Response** tailored to the specific action you've taken.
## Three Ways to Send Order Responses
As a supplier, you have three options for providing Order Responses via in Procuros
Create Order Responses directly in the Procuros portal using the built-in form interface.
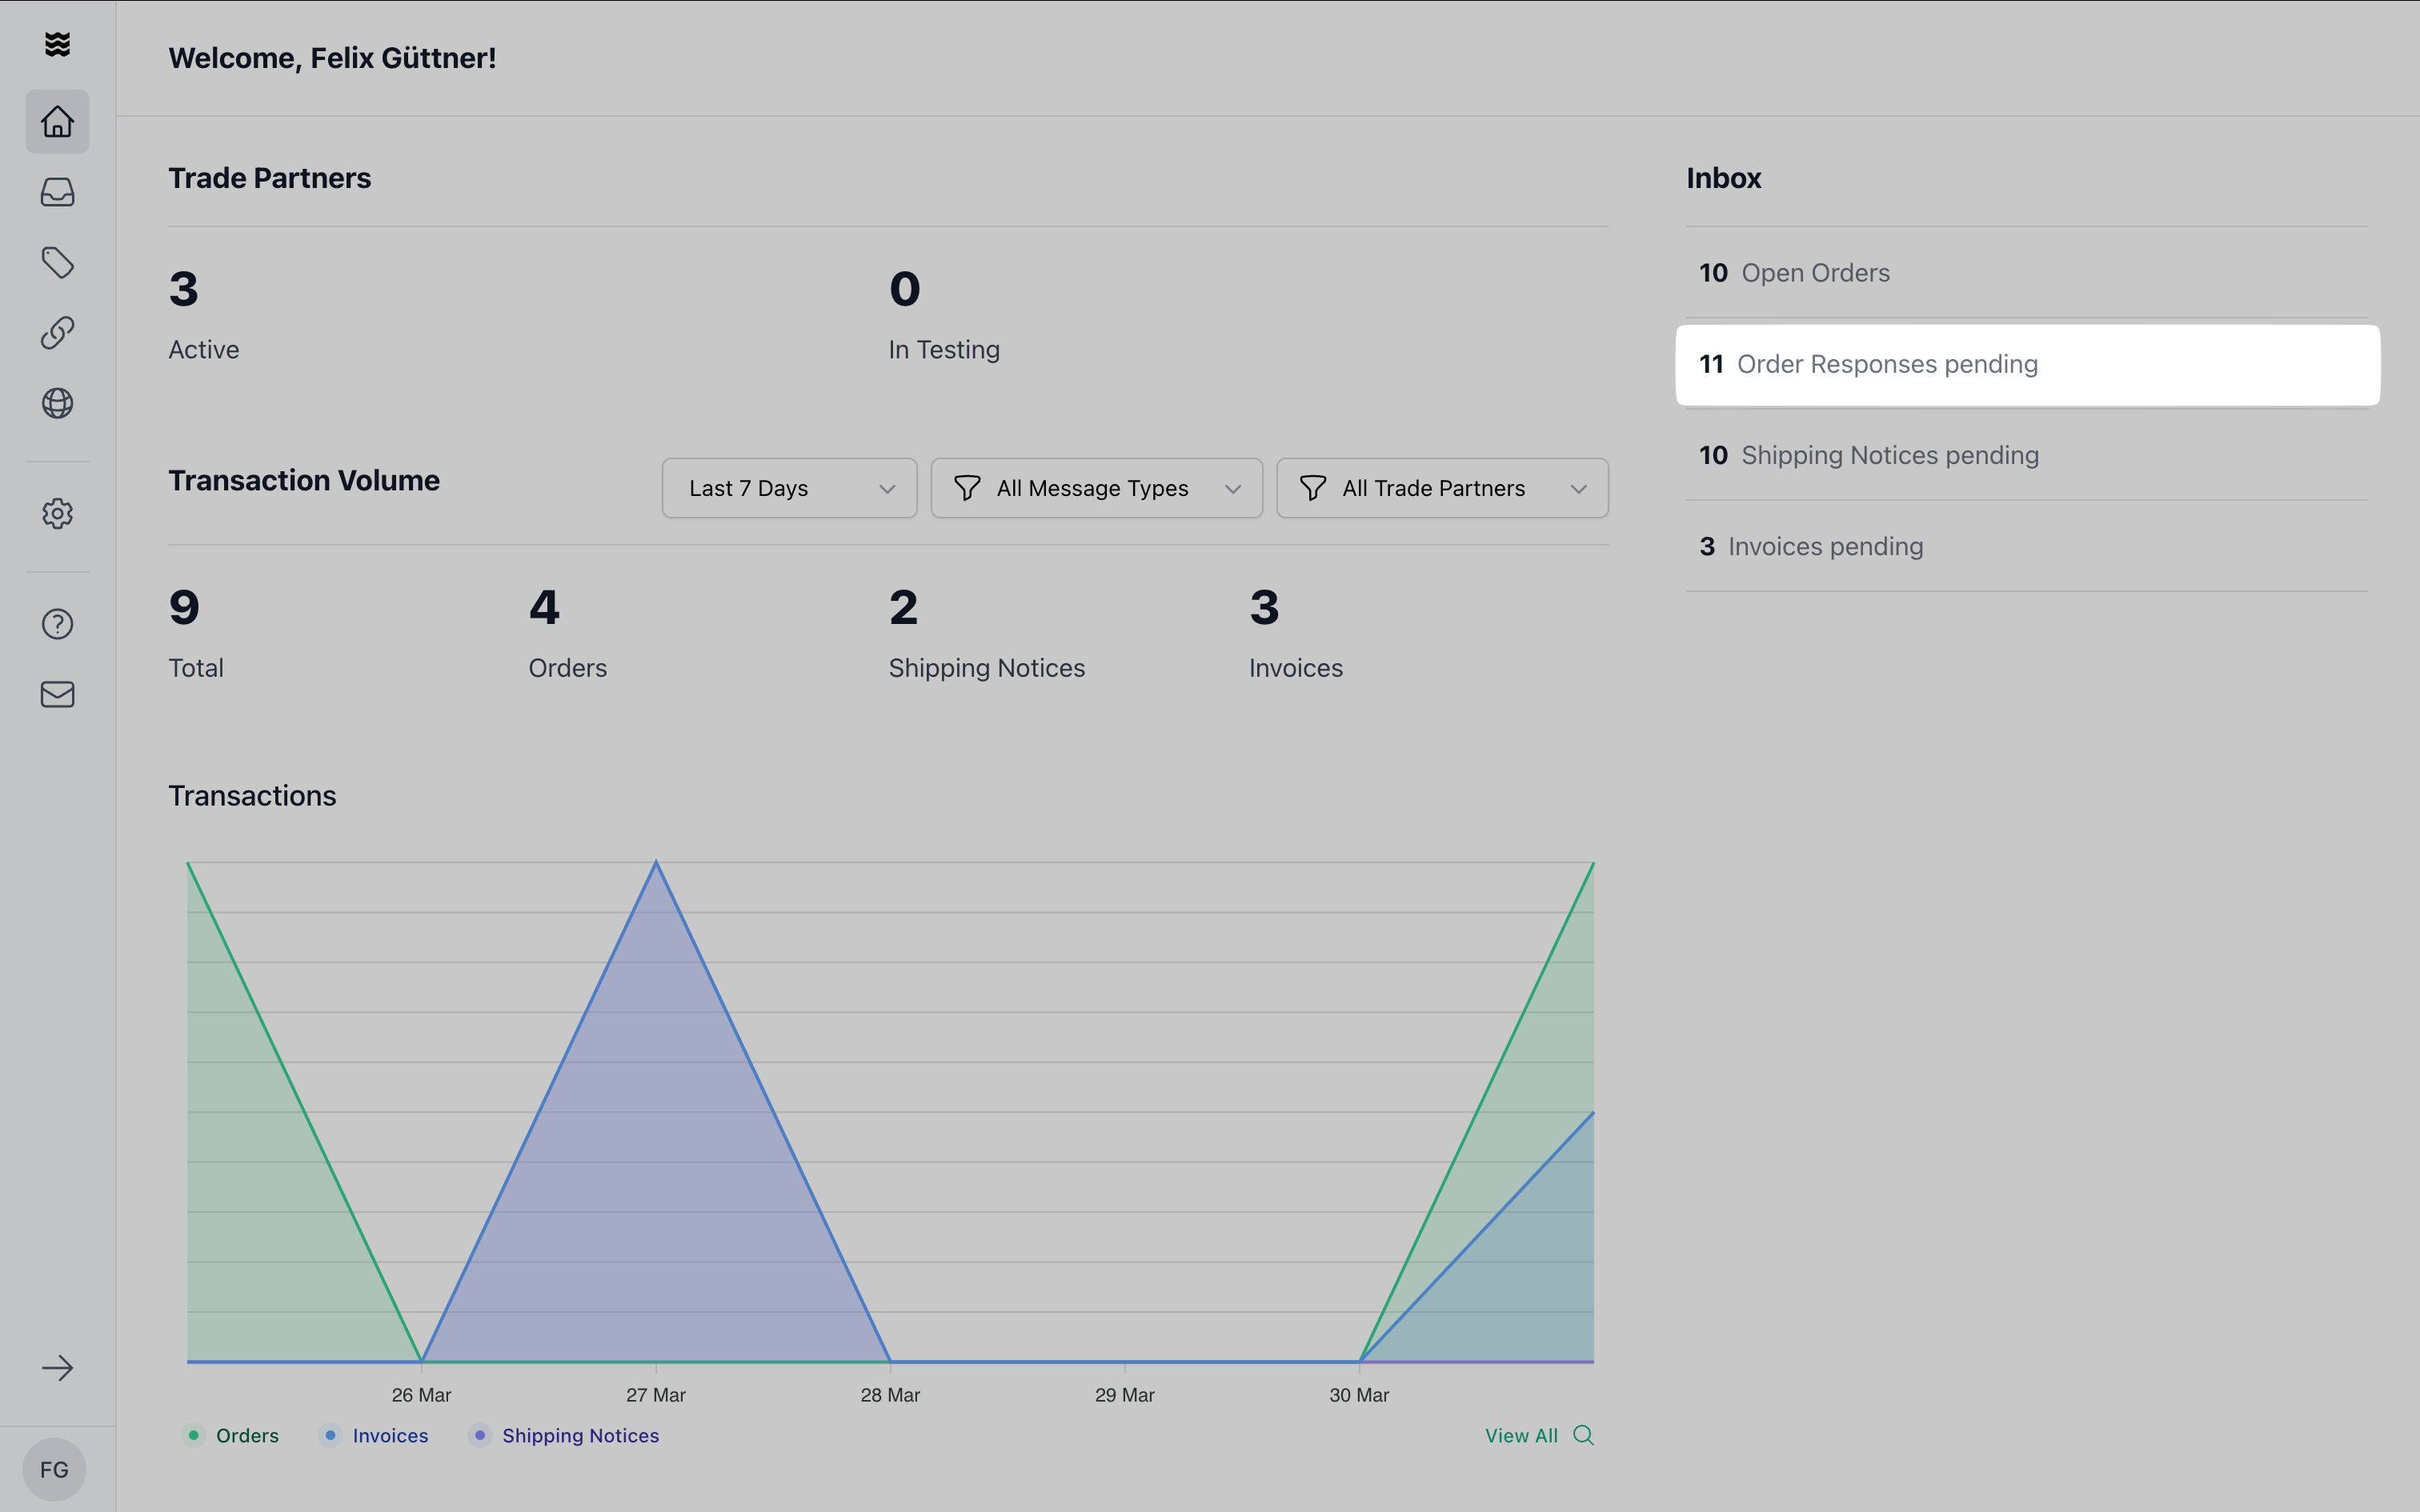
**Accessing Order Responses**
There are two ways to create a new order response:
1. Open the dashboard.
2. Navigate to the "Inbox" section.
3. Click on "Order Responses Pending."
4. The overview displays the open orders, where a Order Response is outstanding.
1. Open the "Transactions" section.
2. Use the "Document Type" filter.
3. Select "Orders".
4. If you click on the individual orders, you can create a response in the top right-hand corner for those where a response is pending.
When you receive an order via Procuros, you can respond in three ways:
* **Confirm the order** if everything looks good
* **Reject the order** entirely if you cannot fulfill it
* **Partially confirm the order** if some items, quantities or dates needs to be adjusted
Each of these actions creates an **Order Response** tailored to the specific action you've taken.
## Three Ways to Send Order Responses
As a supplier, you have three options for providing Order Responses via in Procuros
Create Order Responses directly in the Procuros portal using the built-in form interface.
**Accessing Order Responses**
There are two ways to create a new order response:
1. Open the dashboard.
2. Navigate to the "Inbox" section.
3. Click on "Order Responses Pending."
4. The overview displays the open orders, where a Order Response is outstanding.
1. Open the "Transactions" section.
2. Use the "Document Type" filter.
3. Select "Orders".
4. If you click on the individual orders, you can create a response in the top right-hand corner for those where a response is pending.
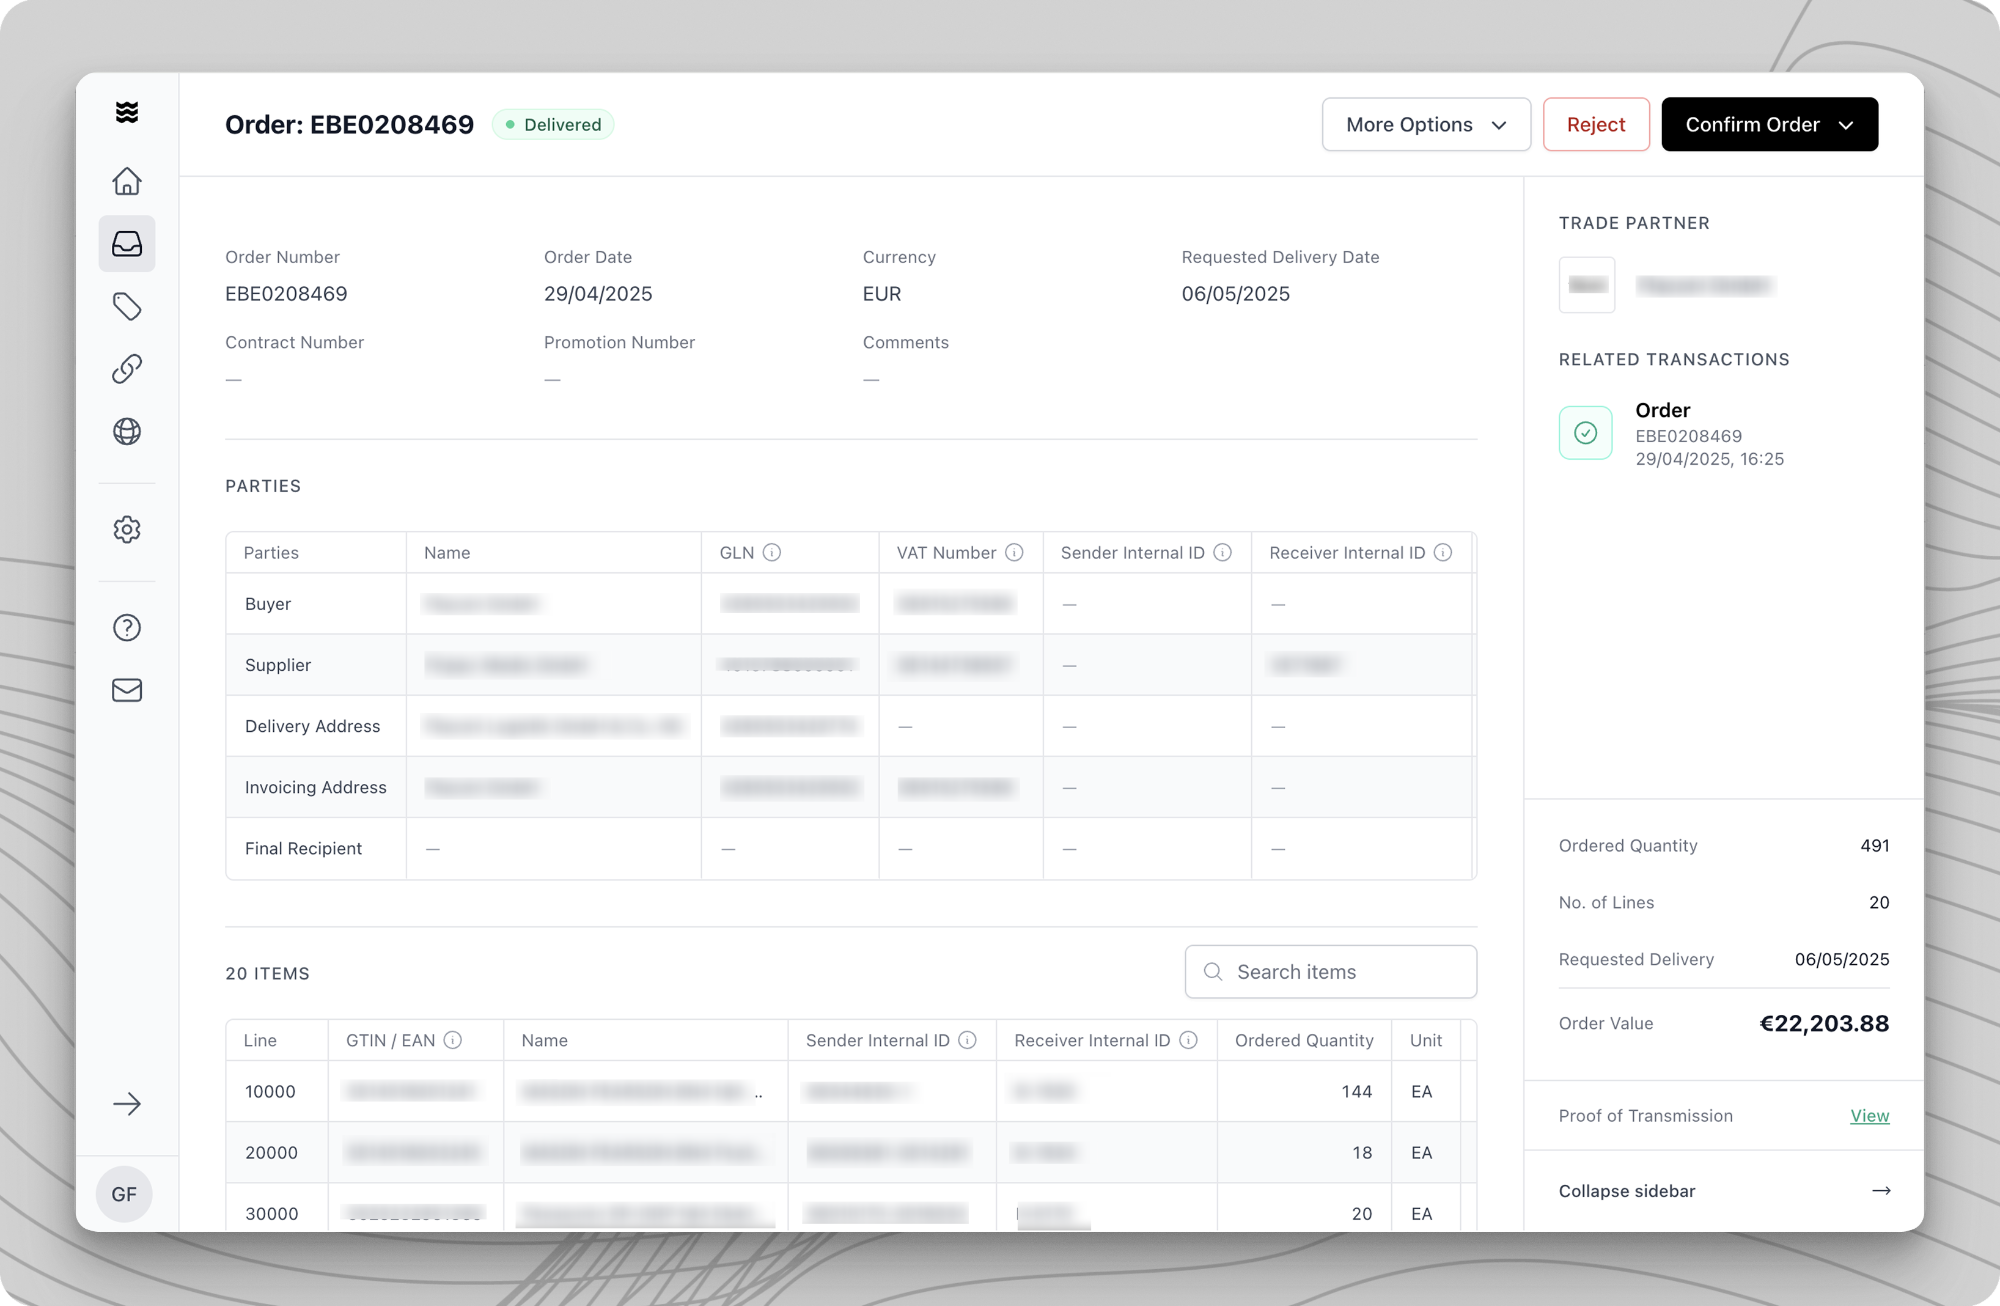
 **Confirming the Entire Order**
If you can fulfill everything as requested:
1. Click **"Confirm Order"** in the top-right corner of the order page.
2. Select **"Confirm Entire Order"**.
3. Review the order summary to ensure everything is accurate.
4. Click **"Send Order Confirmation"** to complete the process.
The confirmation will be sent to your trading partner, and the order will be marked as confirmed in the system.
**Rejecting the Order**
If you cannot fulfill the order at all:
1. Click **"Reject"** in the top-right corner of the order page.
2. Select a reason from the list. If your reason isn't listed, choose **"Other"** and provide a brief explanation.
3. Confirm by clicking **"Reject"** again to send the rejection to your trading partner.
Once rejected, the order will be marked accordingly and no further action will be required.
**Partially Confirming an Order**
If you need to make changes to an Order, like changing items quantities or delivery date:
1. Click **"Confirm Order"** in the top-right corner of the order page.
2. Select **"Partially Confirm Order"**.
3. Apply the changes needed, check "Editing a Partial Order Confirmation" section for further details.
4. Click **"Send"**.
5. Review the order summary to ensure everything is accurate.
6. Click **"Send Order Confirmation"** to complete the process.
The partial confirmation will be sent to your trading partner, and the order will be marked as partially confirmed in the system.
**Fill in Header Data**
The upper section of the document contains essential order details:
* **Mandatory Fields** are marked with an asterisk (\*).
* **Locked Fields** are indicated by a lock icon and cannot be edited.
- Order Confirmation ID\*: Your unique number for this response.
- Order Confirmation Date\*: Default is the current date.
- Order Number\*: Taken from the original order.
- Order Date\*: Date of the original order.
- Requested Delivery Date: Taken from the order.
- Confirmed Delivery Date\*: Your confirmed delivery date.
**Edit Line Items**
To edit multiple or all line items at once, use the "Bulk Edit" function. In the table format, you can select multiple line items and then overwrite individual fields for all selected items.
**Confirming the Entire Order**
If you can fulfill everything as requested:
1. Click **"Confirm Order"** in the top-right corner of the order page.
2. Select **"Confirm Entire Order"**.
3. Review the order summary to ensure everything is accurate.
4. Click **"Send Order Confirmation"** to complete the process.
The confirmation will be sent to your trading partner, and the order will be marked as confirmed in the system.
**Rejecting the Order**
If you cannot fulfill the order at all:
1. Click **"Reject"** in the top-right corner of the order page.
2. Select a reason from the list. If your reason isn't listed, choose **"Other"** and provide a brief explanation.
3. Confirm by clicking **"Reject"** again to send the rejection to your trading partner.
Once rejected, the order will be marked accordingly and no further action will be required.
**Partially Confirming an Order**
If you need to make changes to an Order, like changing items quantities or delivery date:
1. Click **"Confirm Order"** in the top-right corner of the order page.
2. Select **"Partially Confirm Order"**.
3. Apply the changes needed, check "Editing a Partial Order Confirmation" section for further details.
4. Click **"Send"**.
5. Review the order summary to ensure everything is accurate.
6. Click **"Send Order Confirmation"** to complete the process.
The partial confirmation will be sent to your trading partner, and the order will be marked as partially confirmed in the system.
**Fill in Header Data**
The upper section of the document contains essential order details:
* **Mandatory Fields** are marked with an asterisk (\*).
* **Locked Fields** are indicated by a lock icon and cannot be edited.
- Order Confirmation ID\*: Your unique number for this response.
- Order Confirmation Date\*: Default is the current date.
- Order Number\*: Taken from the original order.
- Order Date\*: Date of the original order.
- Requested Delivery Date: Taken from the order.
- Confirmed Delivery Date\*: Your confirmed delivery date.
**Edit Line Items**
To edit multiple or all line items at once, use the "Bulk Edit" function. In the table format, you can select multiple line items and then overwrite individual fields for all selected items.
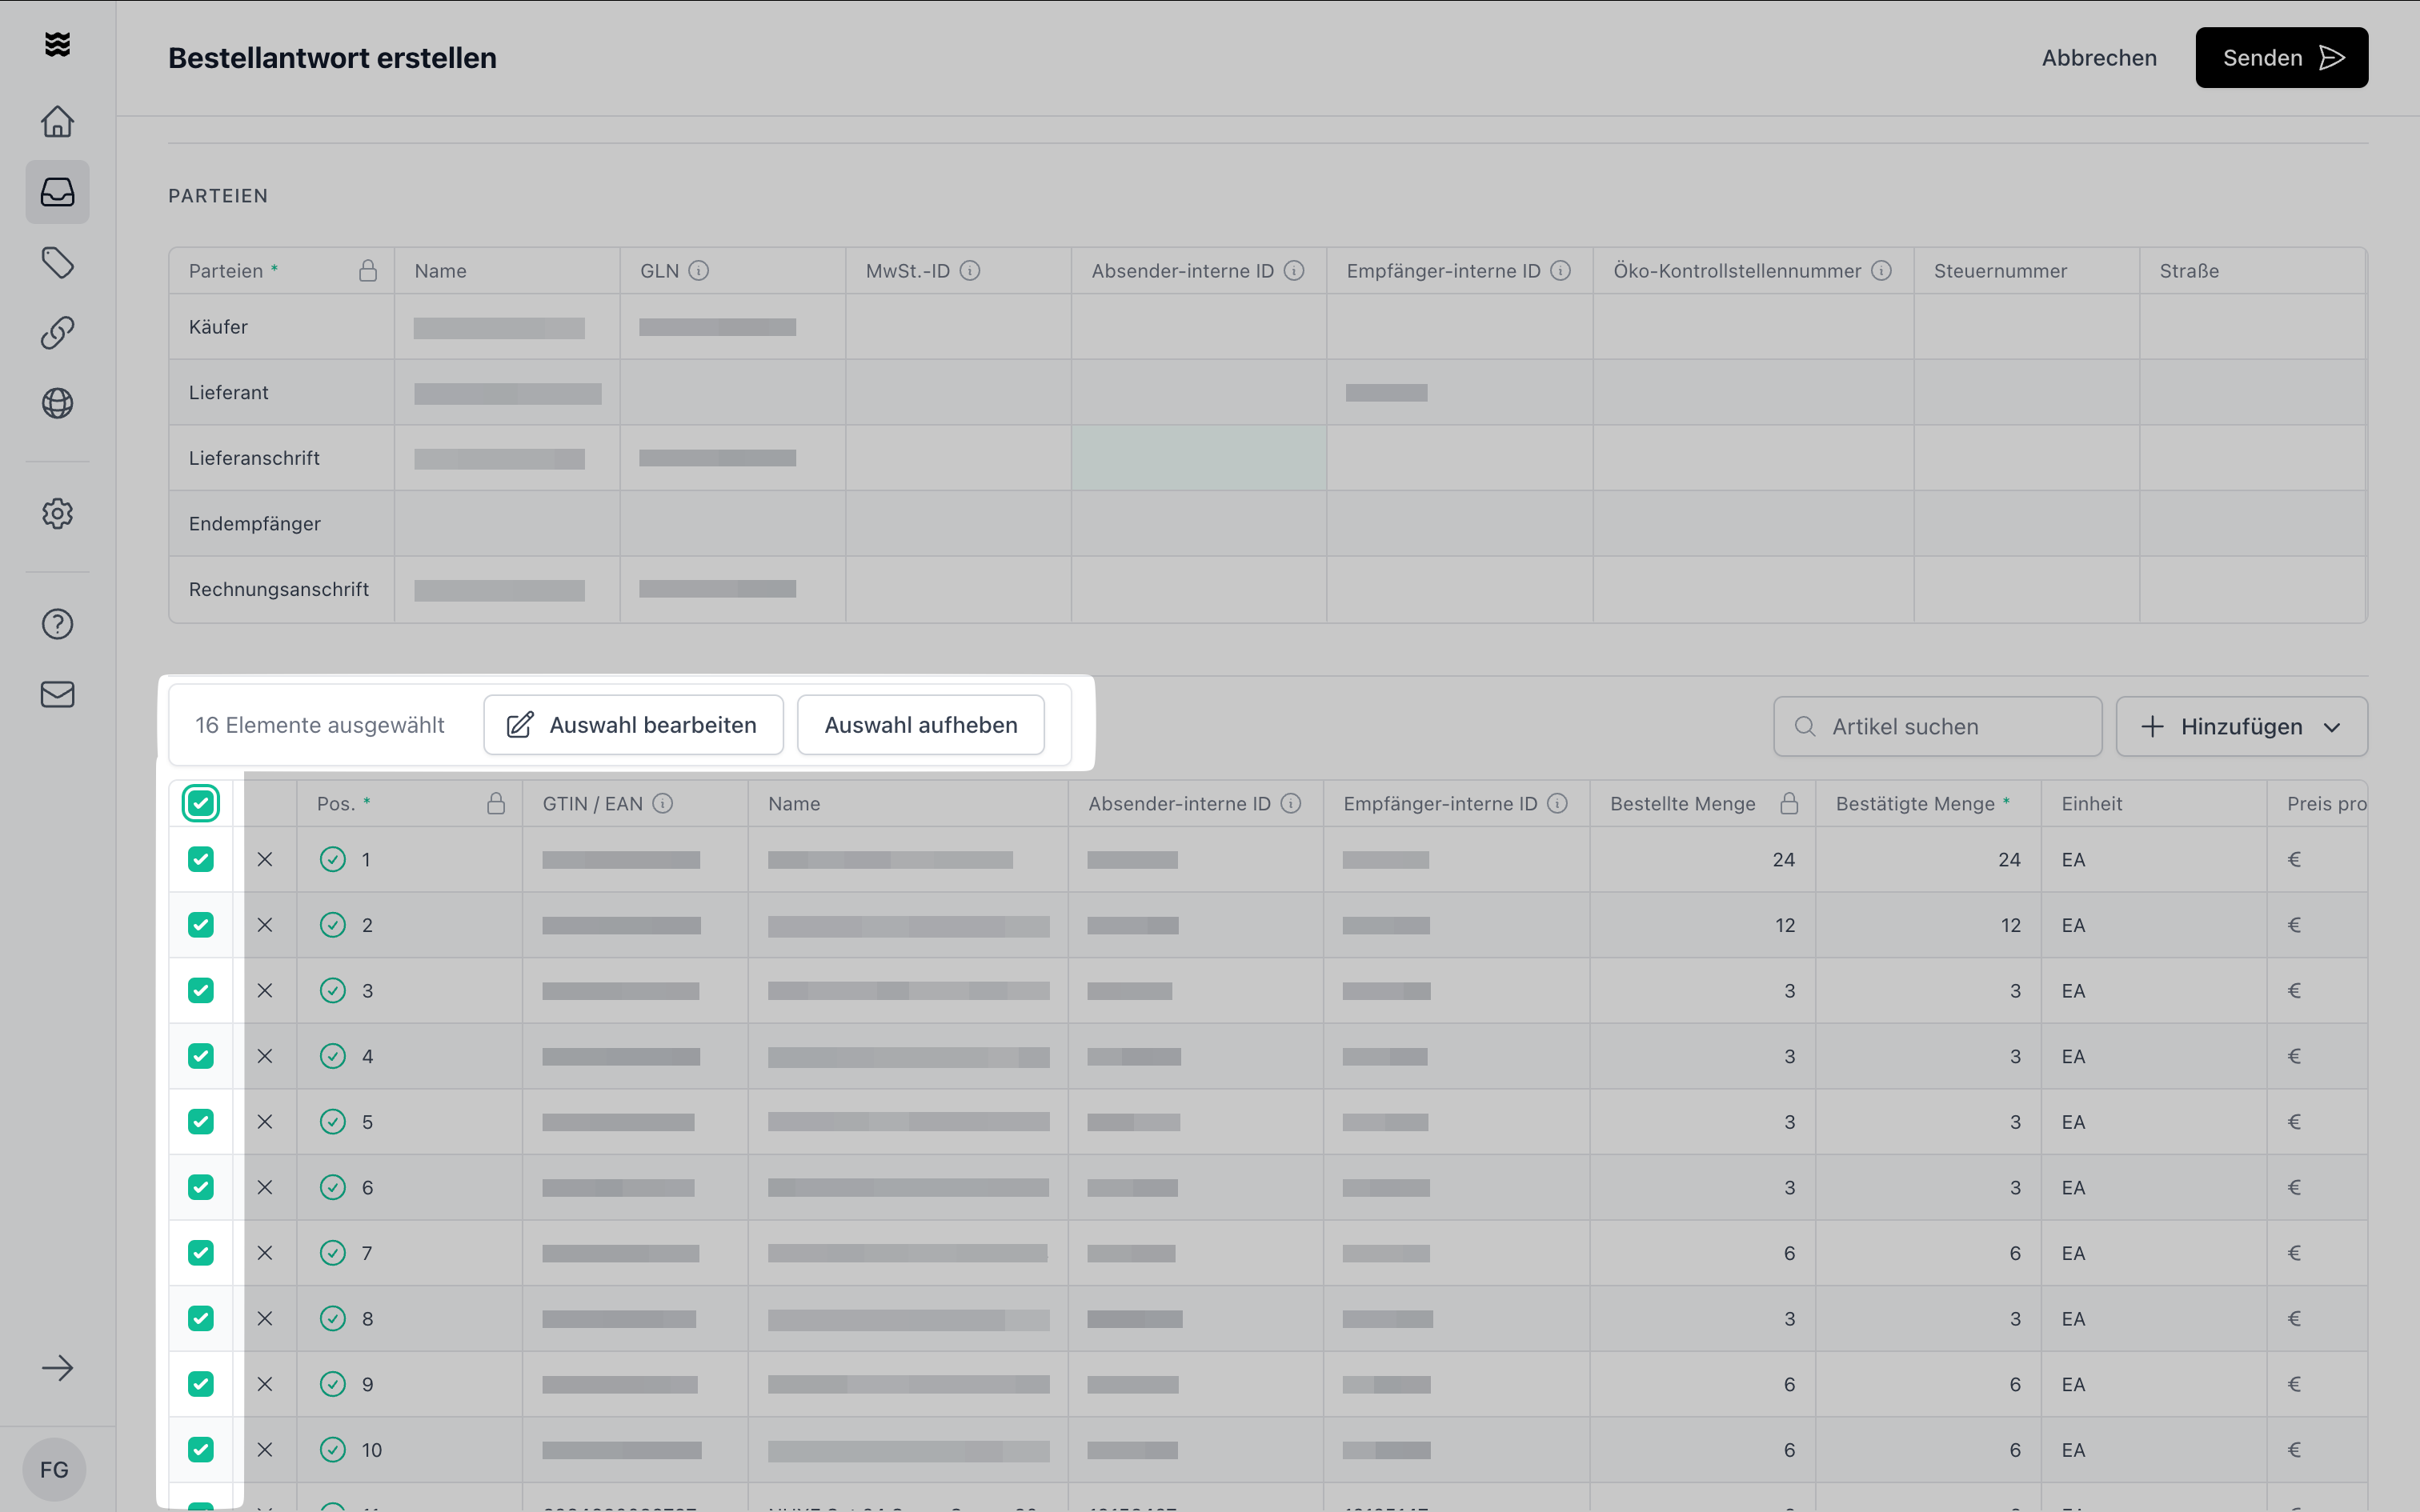 The line item overview lists all ordered products:
Enter the actual deliverable quantity for each item in the "Confirmed Quantity" field. You can remove individual items from the order by clicking the "X" on the left of each row. Clicking again restores the item.
Specify the confirmed delivery date for each item.
Check the prices and adjust them if needed.
**Send Document**
Before sending, the system automatically checks all required fields:
1. Click "Send."
2. If any mandatory fields are missing, they will be highlighted.
3. Follow the issue resolution assistant.
4. Once all issues are corrected, you can resend the document.
The issue resolution assistant guides you step by step through all pending issues until they are resolved.
**Advantage to create an Order Response manually**\
If you can't provide order responses differently this is your option to easily create them.
Upload an existing Order Response as a PDF file.
**Steps to follow**
1. Open the corresponding order.
2. Click on "Confirm Order" in the top right corner.
3. Select "Upload Document."
4. Upload an existing order response.
If you submit your order response via portal upload **for the first time**, processing may take up to 24 hours while the Procuros team configures the scanning system. Please always use a single PDF document format.
Manually uploaded documents are directly enriched with the initial order information - therefore we need less information.
**Steps to follow**
1. Get your personalized "Procuros inbound" email after your first order. Contact [**help@procuros.com**](mailto:help@procuros.com) in case you did not receive it.
2. Send PDF of your order responses to your personalized "Procuros inbound" email (no subject or text needed). We recommend saving this email in your system for automatic sending or setup automatic forwarding within your ERP or email client. Learn more about it [**here**](https://docs.procuros.io/en/general/portal/transactions/setting-up-email-forwarding).
3. Verify delivery status by checking the portal, where all transaction records are visible (if needed).
If you submit your order response via "Procuros inbound" email **for the first time**, processing may take up to 24 hours while the Procuros team configures the scanning system. Please always use a single PDF document format.
**Key Rules for Email PDF Forwarding**
1. Only send one order response per PDF file. Do not send multiple order responses within one PDF file.
* Our system will only process the first one and disregard all others
* Maximum capacity = 10 PDF files or 30 MB
2. Provide all necessary information on the order response.
3. Only order responses for orders received via Procuros will be processed - others will be rejected.
4. If your order response wasn't processed, you will receive an email with the explanation. If this email directs you to the portal, please follow the instructions there.
The line item overview lists all ordered products:
Enter the actual deliverable quantity for each item in the "Confirmed Quantity" field. You can remove individual items from the order by clicking the "X" on the left of each row. Clicking again restores the item.
Specify the confirmed delivery date for each item.
Check the prices and adjust them if needed.
**Send Document**
Before sending, the system automatically checks all required fields:
1. Click "Send."
2. If any mandatory fields are missing, they will be highlighted.
3. Follow the issue resolution assistant.
4. Once all issues are corrected, you can resend the document.
The issue resolution assistant guides you step by step through all pending issues until they are resolved.
**Advantage to create an Order Response manually**\
If you can't provide order responses differently this is your option to easily create them.
Upload an existing Order Response as a PDF file.
**Steps to follow**
1. Open the corresponding order.
2. Click on "Confirm Order" in the top right corner.
3. Select "Upload Document."
4. Upload an existing order response.
If you submit your order response via portal upload **for the first time**, processing may take up to 24 hours while the Procuros team configures the scanning system. Please always use a single PDF document format.
Manually uploaded documents are directly enriched with the initial order information - therefore we need less information.
**Steps to follow**
1. Get your personalized "Procuros inbound" email after your first order. Contact [**help@procuros.com**](mailto:help@procuros.com) in case you did not receive it.
2. Send PDF of your order responses to your personalized "Procuros inbound" email (no subject or text needed). We recommend saving this email in your system for automatic sending or setup automatic forwarding within your ERP or email client. Learn more about it [**here**](https://docs.procuros.io/en/general/portal/transactions/setting-up-email-forwarding).
3. Verify delivery status by checking the portal, where all transaction records are visible (if needed).
If you submit your order response via "Procuros inbound" email **for the first time**, processing may take up to 24 hours while the Procuros team configures the scanning system. Please always use a single PDF document format.
**Key Rules for Email PDF Forwarding**
1. Only send one order response per PDF file. Do not send multiple order responses within one PDF file.
* Our system will only process the first one and disregard all others
* Maximum capacity = 10 PDF files or 30 MB
2. Provide all necessary information on the order response.
3. Only order responses for orders received via Procuros will be processed - others will be rejected.
4. If your order response wasn't processed, you will receive an email with the explanation. If this email directs you to the portal, please follow the instructions there.