> ## Documentation Index
> Fetch the complete documentation index at: https://docs.procuros.io/llms.txt
> Use this file to discover all available pages before exploring further.
# Notifications Management
> Learn how to manage document-level and relationship-level responsible users for notifications in the Procuros Portal.
Procuros allows you to control who receives notifications about document exchanges. You can configure notification recipients at two levels: **document-level** and **relationship-level**. Together, these give you flexible control over who gets notified — from broad company-wide defaults down to specific overrides for individual trade partners.
## Understanding Notification Levels
### Document-Level Responsible Users
Document-level responsible users are the **default recipients** for notifications related to a specific document type (e.g., Invoices, Credit Notes, Price Catalogs). These are configured centrally in your company settings and apply across **all** your trade partner connections.
For example, if you add `accounting@yourcompany.com` as a document-level responsible user for Invoices, that address will receive invoice-related notifications from every trade partner — unless a relationship-level override is in place.
### Relationship-Level Responsible Users
Relationship-level responsible users allow you to **override the document-level defaults** for a specific trade partner connection. When set, they completely replace the document-level responsible users for that particular partner and document type — the two lists are not merged.
This is useful when different teams or contacts within your organization are responsible for specific trade partners. For example, you might want `team-a@yourcompany.com` to handle invoice notifications from Partner A, while all other partners continue using the default `accounting@yourcompany.com`.
## Contacts Declared by Your Trade Partner
Besides the responsible users you configure, Procuros can also use contacts that your trade partner declares directly inside the documents they send you. This behavior is governed by a setting that is available at both the document level and the relationship level.
* **Default** — Procuros respects the responsible users you have configured; those are the recipients used for the related notifications.
* **Accept contacts declared by trade partner** — any relevant contact defined by the sender within the document is considered a recipient for the related notifications.
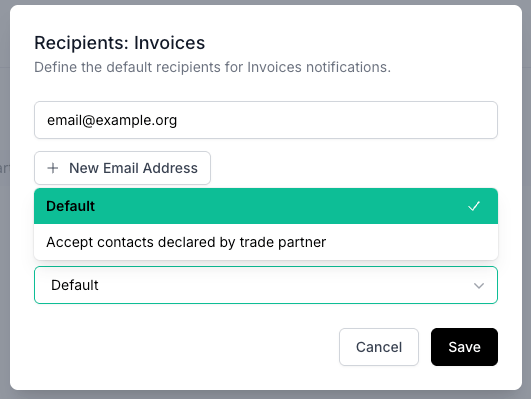 Enable **Accept contacts declared by trade partner** when your partner routinely includes the right operational contact in the documents they send, and you want those contacts to be notified automatically without having to maintain them manually.
## Editing Responsible Users
When you click **Edit** (either at the document level or relationship level), a dialog opens where you can manage the list of email addresses.
Enable **Accept contacts declared by trade partner** when your partner routinely includes the right operational contact in the documents they send, and you want those contacts to be notified automatically without having to maintain them manually.
## Editing Responsible Users
When you click **Edit** (either at the document level or relationship level), a dialog opens where you can manage the list of email addresses.
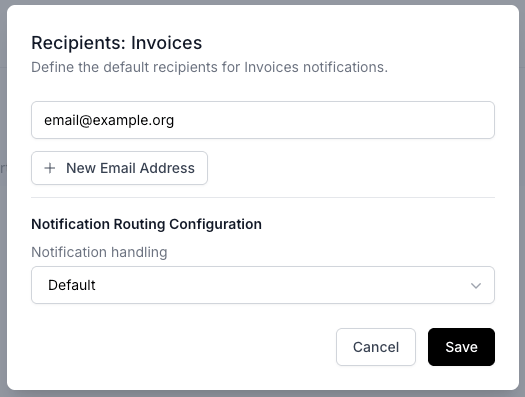 Enter a valid email address in the input field and click **+ New Email Address** to add it to the list.
Remove existing email addresses by clicking the remove button next to them.
Click **Save** to apply your changes, or **Cancel** to discard them.
## Managing Document-Level Responsible Users
To configure the default notification recipients for each document type, navigate to the Notifications Management settings page.
Enter a valid email address in the input field and click **+ New Email Address** to add it to the list.
Remove existing email addresses by clicking the remove button next to them.
Click **Save** to apply your changes, or **Cancel** to discard them.
## Managing Document-Level Responsible Users
To configure the default notification recipients for each document type, navigate to the Notifications Management settings page.
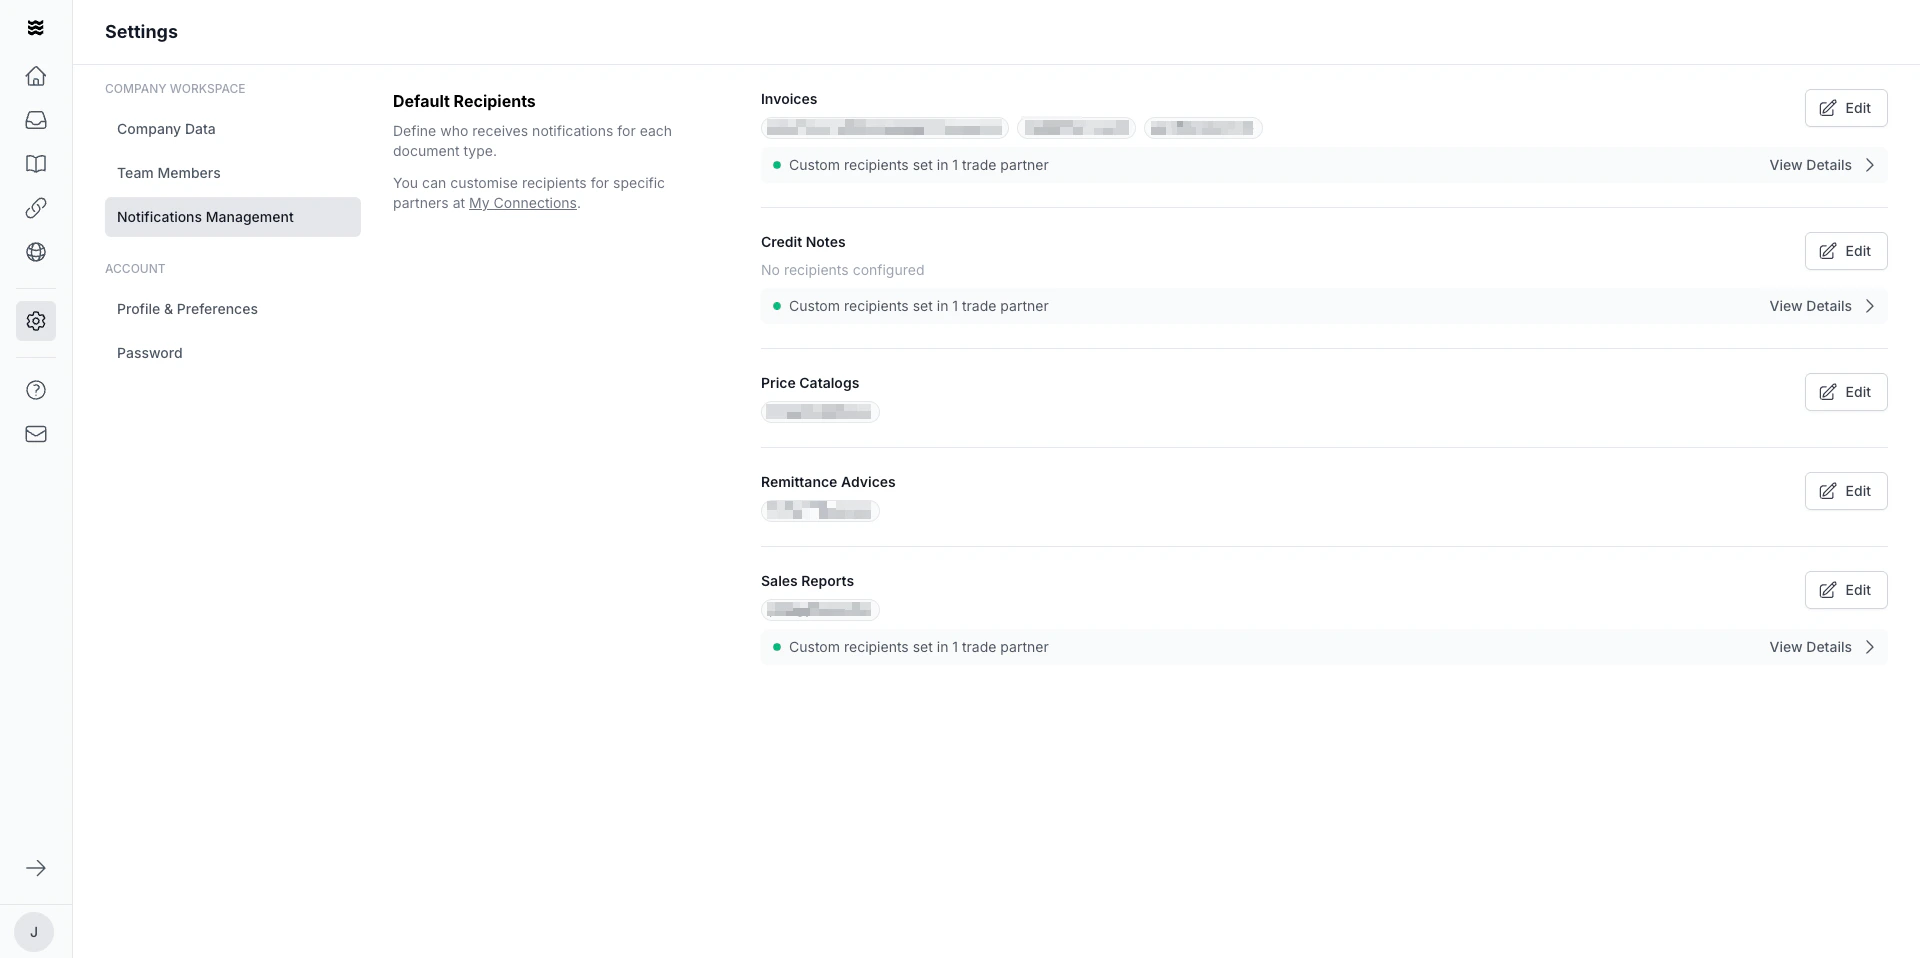 Navigate to **Settings** in the left sidebar and select **Notifications Management**.
The page lists all available document types (e.g., Invoices, Credit Notes, Price Catalogs, Remittance Advices, Sales Reports) along with the currently configured responsible users for each.
Click the **Edit** button next to a document type to add or remove email addresses. Changes apply to all trade partners that do not have relationship-level overrides.
Each document type also has a contact-handling option. Choose **Default** to use only your configured responsible users, or **Accept contacts declared by trade partner** to also treat relevant contacts the sender declares within the document as recipients. See [Contacts Declared by Your Trade Partner](#contacts-declared-by-your-trade-partner) for details.
If a document type shows "No recipients configured", no one will receive notifications for that document type unless relationship-level responsible users are set for specific partners.
### Viewing Relationship-Level Overrides
When one or more trade partners have custom responsible users configured for a document type, you will see a green indicator below the document type with the text **"Custom recipients set in X trade partner(s)"**.
Navigate to **Settings** in the left sidebar and select **Notifications Management**.
The page lists all available document types (e.g., Invoices, Credit Notes, Price Catalogs, Remittance Advices, Sales Reports) along with the currently configured responsible users for each.
Click the **Edit** button next to a document type to add or remove email addresses. Changes apply to all trade partners that do not have relationship-level overrides.
Each document type also has a contact-handling option. Choose **Default** to use only your configured responsible users, or **Accept contacts declared by trade partner** to also treat relevant contacts the sender declares within the document as recipients. See [Contacts Declared by Your Trade Partner](#contacts-declared-by-your-trade-partner) for details.
If a document type shows "No recipients configured", no one will receive notifications for that document type unless relationship-level responsible users are set for specific partners.
### Viewing Relationship-Level Overrides
When one or more trade partners have custom responsible users configured for a document type, you will see a green indicator below the document type with the text **"Custom recipients set in X trade partner(s)"**.
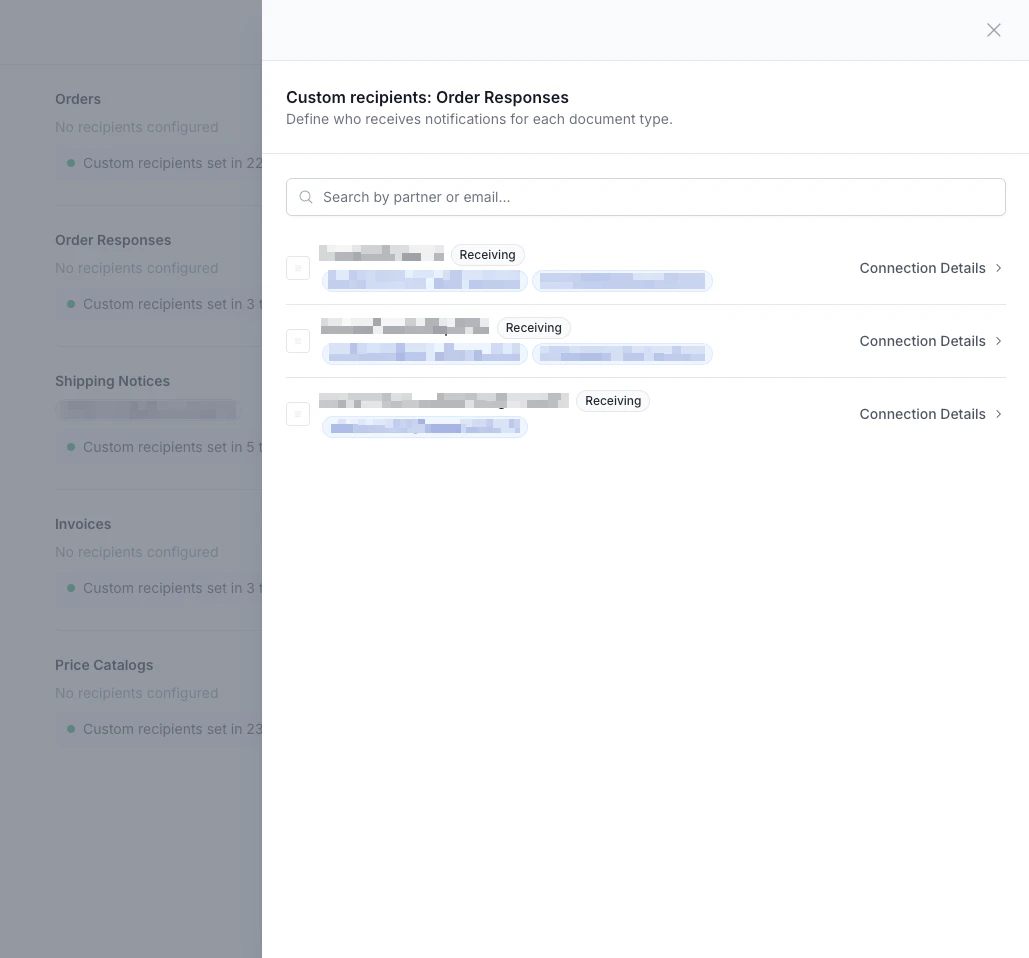 Click **View Details** to open a side panel that shows which partners have custom responsible users and the email addresses configured for each. You can search by partner name or email address to quickly find specific overrides.
## Managing Relationship-Level Responsible Users
To configure notification recipients for a specific trade partner and document type, navigate to the connection's Notifications Management tab.
Click **View Details** to open a side panel that shows which partners have custom responsible users and the email addresses configured for each. You can search by partner name or email address to quickly find specific overrides.
## Managing Relationship-Level Responsible Users
To configure notification recipients for a specific trade partner and document type, navigate to the connection's Notifications Management tab.
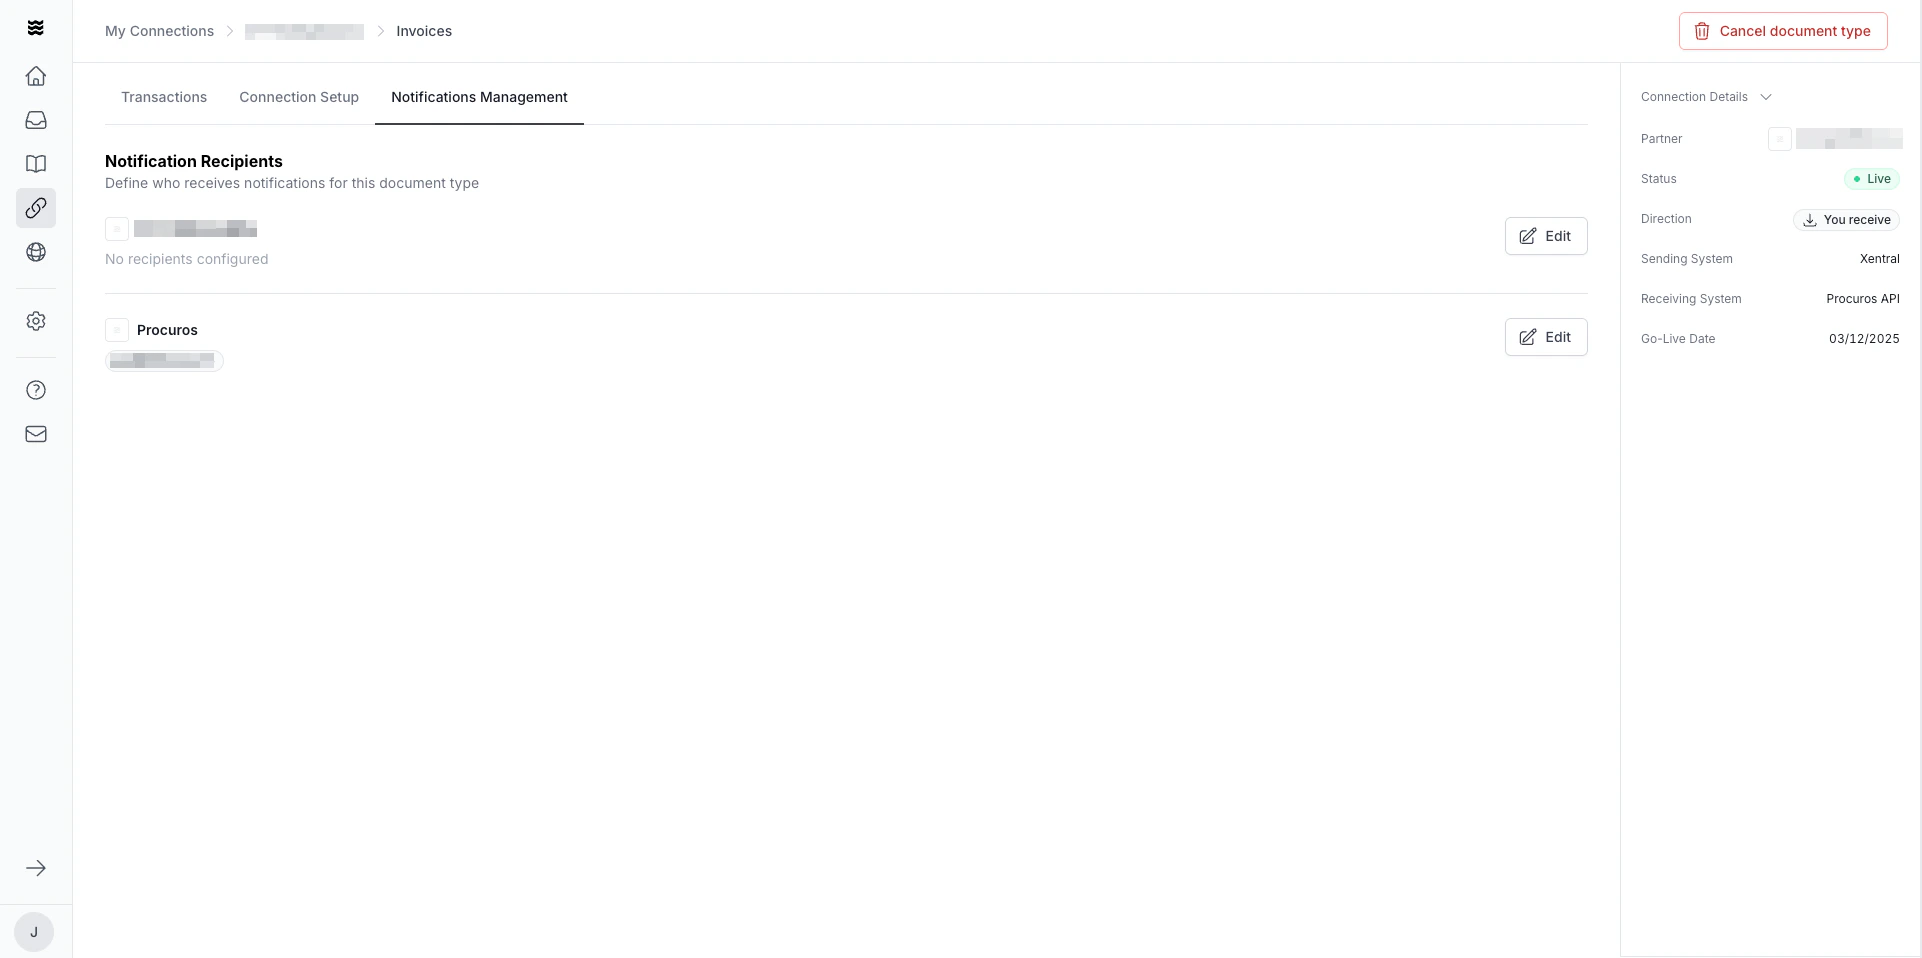 Go to **My Connections** in the left sidebar, select a trade partner, and open the relevant document type.
Click the **Notifications Management** tab in the document type detail view.
The page shows both parties in the connection. Click **Edit** next to a party to configure who receives notifications for this specific partner and document type.
The same contact-handling option is available here for this specific partner and document type, and it overrides the document-level choice for that connection. Choose **Default** or **Accept contacts declared by trade partner**. See [Contacts Declared by Your Trade Partner](#contacts-declared-by-your-trade-partner) for details.
**Editing permissions depend on your partner's status.** If your trade partner is not a Procuros customer, you can edit the responsible users for both parties in the connection. If your trade partner is also a Procuros customer, you can only edit your own party's responsible users — the other party's recipients are managed by them and shown as read-only with the label "Recipients are defined by your trade partner".
## Unrecognized Email Domains
To protect against misconfigured notifications, Procuros verifies the email domains used for notification recipients. When you save changes that include email addresses from domains that have not been previously approved for your organization, Procuros will show a review dialog before applying the changes.
Go to **My Connections** in the left sidebar, select a trade partner, and open the relevant document type.
Click the **Notifications Management** tab in the document type detail view.
The page shows both parties in the connection. Click **Edit** next to a party to configure who receives notifications for this specific partner and document type.
The same contact-handling option is available here for this specific partner and document type, and it overrides the document-level choice for that connection. Choose **Default** or **Accept contacts declared by trade partner**. See [Contacts Declared by Your Trade Partner](#contacts-declared-by-your-trade-partner) for details.
**Editing permissions depend on your partner's status.** If your trade partner is not a Procuros customer, you can edit the responsible users for both parties in the connection. If your trade partner is also a Procuros customer, you can only edit your own party's responsible users — the other party's recipients are managed by them and shown as read-only with the label "Recipients are defined by your trade partner".
## Unrecognized Email Domains
To protect against misconfigured notifications, Procuros verifies the email domains used for notification recipients. When you save changes that include email addresses from domains that have not been previously approved for your organization, Procuros will show a review dialog before applying the changes.
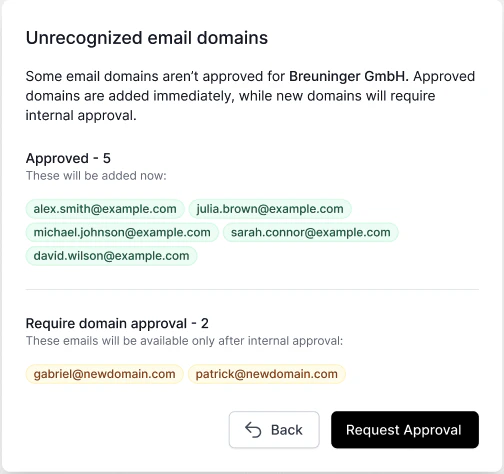 The dialog separates the email addresses into two categories:
* **Approved** — Email addresses from domains that are already recognized by your organization. These are added immediately and will start receiving notifications right away.
* **Require domain approval** — Email addresses from domains that are not yet recognized. These will **not** become active until the domain has been approved internally. The email addresses are shown highlighted in yellow to indicate they are pending.
To submit unrecognized domains for review, click **Request Approval**. You can also click **Back** to return to the edit dialog and remove or correct the email addresses before proceeding.
Until a domain is approved, email addresses from that domain will not receive any notifications. Make sure to follow up on approval requests if notifications are time-sensitive.
This page covers managing **who** receives notifications. To configure **which types** of notifications you personally receive (e.g., issue alerts, incoming documents, sent documents), visit [Profile & Preferences](/en/general/admin/profile-preferences).
The dialog separates the email addresses into two categories:
* **Approved** — Email addresses from domains that are already recognized by your organization. These are added immediately and will start receiving notifications right away.
* **Require domain approval** — Email addresses from domains that are not yet recognized. These will **not** become active until the domain has been approved internally. The email addresses are shown highlighted in yellow to indicate they are pending.
To submit unrecognized domains for review, click **Request Approval**. You can also click **Back** to return to the edit dialog and remove or correct the email addresses before proceeding.
Until a domain is approved, email addresses from that domain will not receive any notifications. Make sure to follow up on approval requests if notifications are time-sensitive.
This page covers managing **who** receives notifications. To configure **which types** of notifications you personally receive (e.g., issue alerts, incoming documents, sent documents), visit [Profile & Preferences](/en/general/admin/profile-preferences).